Understanding YASim's Stall Element
By Gary "Buckaroo" Neely
Every YASim flying surface (wing, hstab, mstab, vstab) should have an element describing stall behavior. A Typical stall element looks much like this:
<stall aoa="16" width="8" peak="1.5" />
Here's what the YASim documentation has to say about the stall element:
stall:    A subelement of a wing (or hstab/vstab/mstab) that specifies the
          stall behavior.
          aoa:   The stall angle (maximum lift) in degrees.  Note that
                 this is relative to the wing, not the fuselage (since
                 the wing may have a non-zero incidence angle).
          width: The "width" of the stall, in degrees.  A high value
                 indicates a gentle stall.  Low values are viscious
                 for a non-twisted wing, but are acceptable for a
                 twisted one (since the whole wing will not stall at
                 the same time).
          peak:  The height of the lift peak, relative to the
                 post-stall secondary lift peak at 45 degrees.
                 Defaults to 1.5.  This one is deep voodoo, and
                 probably doesn't need to change much.  Bug me for an
                 explanation if you're curious.
AoA isn't too difficult to understand, but width and peak are rather mysterious. It took me a long time to understand exactly what these two do. While "deep voodoo" is funny, it's also a bit of a disservice. It's hard to make good decisions without knowing what's going on, so let's take a closer look at these attributes.
AOA
I've interpreted this as critical angle of attack, in other words, the angle of attack (alpha) at which lift is greatest before the onset of stall. As the documentation says, Critical AoA is with respect to the wing, not the fuselage or station line. More on that at the end of this guide.
Typical critical stall AoA is 14-17 degrees for common sport aviation wings. Critical alpha for delta or semi-delta winged aircraft will tend to be a bit higher. If you lack any numbers at all, you might be able to guess at critical alpha by looking at photos of the aircraft on approach, estimating the approach AoA, and doubling that for critical AoA.
Important: All this is based on my original interpretation of YASim stall AoA, founded on the documentation's "maximum lift" reference and before I began exploring the actual YASim code base. After you read about 'peak' and 'width', see the AOA Revisisted section for another more likely interpretation and my recommendation for setting the stall AoA value.
Peak
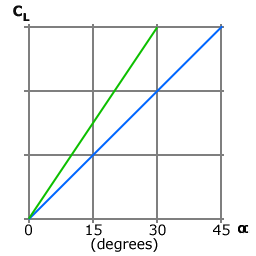
YASim calculates lift by assuming lift rises linearly with alpha up to 45 degrees where maximum or peak lift occurs. If graphed as a line with lift on the y axis and alpha on the x axis, the line would have a slope of 1. This is the blue line on the graph at right. This peak lift is actually secondary, post-stall lift. For most airfoils, there are two lift peaks. The first occurs at the critical alpha, followed by a dip and then a rise again to peak lift at 45 degrees. After 45 degrees, lift falls off dramatically as the airfoil approaches 90 degrees to the airstream.
So YASim first determines a lift function for secondary lift up to 45 degrees. To find the pre-stall lift for alphas less than or equal to the critical-AoA, YASim applies a scalar to the secondary lift function, essentially creating a new function by changing the slope of the original. In my illustration, post-stall lift is indicated by the blue line and pre-stall lift is indicated by the green line.
Andy Ross in his simulation notes describes the stall 'peak' value as the ratio of the heights of the initial stall lift peak to the post-stall 45 degree peak. Peak modifies the slope of the lift line in pre-stall conditions. The actual scalar formula is peak/(2 * stall AoA), so the slope scalar is a function of both the peak value and the critical alpha.
Peak defaults to 1.5. Increasing peak above 1.5 will increase the slope of pre-stall lift, yielding greater lift before stall and a greater loss of lift post-stall. Decreasing the 'peak' yields less pre-stall lift. A peak that results in a lift scalar of 1 would match pre-stall lift to post-stall lift, yielding no lift falloff at stall AoA and therefore no stall at all. For conventional horizontal stabilizers with a positive camber, increasing peak tends to require larger elevator flap "lift" values to achieve good approach elevator values, since the stabilizer serves to counter the wing's negative twisting moment.
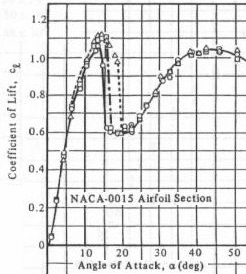
The YASim default peak value of 1.5 may be high for many applications. The peak coefficient of lift of a flat-plate is 1.0 at 45 degrees, and most airfoils have 45 degree results slightly greater than this. At critical alpha, a CL of 1.5 is near the top-end, discounting high-lift devices like flaps which can greatly increase lift at the cost of huge drag. Some airfoils like the Clark-Y and the NACA 2412 get max coefficients around 1.6, but many airfoils are lower, often significantly lower. Symmetrical airfoils like those commonly used for stabilizers will often have lower lift coeffcients. For example, an NACA-0015 would probably have a YASim peak value of about 1.05.
Width
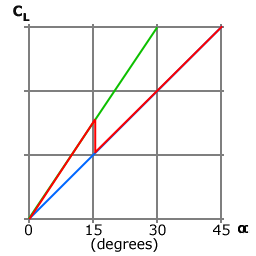
If you've followed me so far, you might be wondering what happens to lift after alpha reaches critical AoA. In my illlustration at right, I show an example where critical AoA is 16 degrees. Follow the red line to see what happens as alpha approaches and then exceeds critical AoA. Before stall, lift follows the green line. After the airfoil stalls, lift begins to follow the blue line. Note the sharp discontinuity at critical AoA. If nothing were done about this, the flight effects would make you regret having a big lunch before the flight.
From the illustration you can see that increasing the peak value above 1.5 not only increases pre-stall lift, but also creates a sharper drop in post-stall lift. Decreasing the peak value yields less pre-stall lift and decreases the post-stall drop in lift.
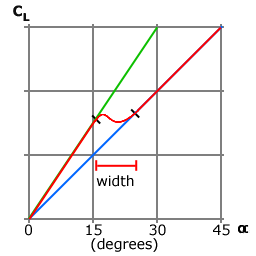
To counter the discontinuity problem, YASim does a cubic interpolation to join the point where the pre-stall lift line at critical alpha meets another point on the post-stall lift line. Since we don't want to join the secondary lift line at the same critical alpha (which would result in the nasty sharp drop we're trying to avoid), YASim offsets the point at which we join the post-stall lift line by some number of degrees. This offset value is the 'width' attribute. Think of this as the width of the stall valley. I've illustrated a case using a critical AoA of 16 and a width of about 8 degrees. The interpolation makes a curve that joins the two points, with a valley between them. (Don't get hung up on the values and shapes of the illustration-- the point is to give an idea of what's happening rather than illustrate a real airfoil.)
Setting a width of 0 would be the same thing as joining the secondary lift line where it is intercepted by critical alpha, essentially the same thing as shown in the second illustration, the nasty drop. Setting a broad width makes for an increasingly shallow drop in lift, or maybe no drop at all, possibly eliminating the effects of stall. The maximum value that has any mathematical sense would then be width=45-criticalAoA, which would essentially create a linear interpolation from critical alpha to maximum lift at 45 degrees. In other words, no valley or drop-off at all. This would be highly unrealistic, at least for most airfoils and certainly for high-aspect wings.
|
Why do we care about this drop in lift at all? If there's a secondary lift peak, why not keep pushing forward in flight until lift picks us up again? The answer is that most planes simply don't have the power to keep muscling forward into higher AoA regions. Also, typical flight surfaces will have stalled in that region, with the corresponding loss of control. Some high-performance aircraft can fly in these high-AoA regimes by means of extreme engine power, wing configuration, specialized control surfaces, and vectored thrust. |
What should width be? The only way to know for sure is to have a good airfoil data showing lift plotted against angle of attack. If you don't have that or you have partial data up to critical AoA or maybe a little beyond, you can estimate width by examining the curve at critical AoA where lift begins to fall off. Estimate the radius of that curve and double it for a reasonable width value. For example, if the radius appears to be 4 degrees or so, you might set width to 8. If you lack this data, try using a value of 6 to 10 for wings, and about 4 for stabilizers. A narrow width for a high-aspect wing with little or no twist can give very nasty stalls because the entire wing starts falling into that post-stall valley at the same time. Wing twist mitigates this, since the inboard wing surfaces begin to feel stall effects before the outboard surfaces, spreading the effects of the stall out over time.
AOA Revisited
I've wondered about the effects of the interpolation associated with width. Due to the interpolation, lift could continue to rise at a decreasing rate until the interpolated curve begins to dip down into the valley. The effect would be minimal for narrow widths, but significant at larger widths. In the past I've interpreted YASim stall AoA as critical AoA because the documentation reads "The stall angle (maximum lift)", but I believe what YASim is calling stall AoA is actually the beginning of the stall region where lift begins to decline, not the point of maximum lift before the decline. There are other indications that support this. In a dev list post I once saw Andy state that for typical airfoils the YASim stall AoA should be in the 12-14 degree range. This puzzled me, because most general aviation airfoils have a critical AoA of 15-17 degrees. I've long had a gut feeling that YASim aircraft tend to stall at higher alphas than they should. Running some numbers through the relevant YASim code seems to support this argument.
If this reasoning is valid, and I think it is, then here's my suggestion for setting the YASim stall AoA value: critical AoA - width/4. In other words, research the airfoil's critical AoA, select a reasonable stall width (4-12 degrees), and deduct a quarter of the width from the critical AoA to get your YASim stall AoA value. So if critical AoA is 16 and you are using a width of 8, try a stall AoA of 14. Test fly your results and change from there. This is the method I've been using lately, and I get better results.
Putting It All Together
The stall element is the prime influence on stall behavior in a YASim aircraft, but two other factors from the <wing> element are important: incidence and twist.
Wing incidence is the angle between the wing's chord line and the fuselage longitudinal line. If the wing chord line was parallel to the longitudinal axis, then angle of attack for the wing is simply the relationship between the airstream and the longitudinal axis. But often the wing is set with a positive incidence-- the chord line is inclined a few degrees from the longitudinal axis. Aerodynamically speaking, the fuselage doesn't matter a whole lot-- you're flying the wing, not the fuselage, which is more like baggage for the wing. But YASim needs a reference axis, which typically runs along the longitudinal axis of the fuselage in most models.
What does this mean for stalls? If an aircraft with a 2 degree wing incidence is flying at an AoA of 4 degrees (as reported by the simulator with respect to the longitudinal axis), then the wing is actually seeing an AoA of 6 degrees. If this same wing begins to stall at 14 degrees, the pilot will begin to notice the effects at 12 degrees.
Twist complicates things a little further. Most wings have some twist, usually a 'washout' that reduces the effective angle of attack of the wing from the chord to the tip. The function is to make sure the inboard wing stalls before the outboard wing where the ailerons live, so the pilot can maintain control through the initial stall regime. If a wing has no twist, the entire span stalls at the same time. A wing with some twist spreads the effects of the stall out over time.
The effect of twist begins at 0 degrees at the root and increases to maximum at the tip. If a wing begins to stall at 14 degrees and has a washout twist of -3 degrees, the wing's root will begin to stall at 14 degrees. But the tip of the wing has its incidence reduced by 3 degrees due to the twist, and it will not begin to stall until the angle of attack reaches 17 degrees. So the effects of the stall are spread out not only by the width of the stall, but also by the twist.
So let's put everything together. Say you have a wing with an incidence of 2 degrees and a twist of -3 degrees. You also have a stall AoA set to 14 degrees. The root will begin to stall at 14 - 2 + 0 = 12 degrees. The tip will begin to stall at 14 - 2 + 3 = 15 degrees.
Twist can have a significant effect on wing-dropping at stall. A plane with little or no twist is likely to drop a wing soon after the onset of stall. Adding significant twist can reduce or eliminate this effect. Be aware that if the plane is pushed further into the stall regime, especially past critical alpha, it may drop a wing anyway. Many planes are notorious for wing-dropping at stall, but others are very gentle and may just drop the nose or begin to mush downwards. Adjusting the twist and width values are your best tools for affecting this behavior.
Be aware that load and balance can also affect stall behaivor. A nose-heavy load can result in insufficient elevator authority to pull the plane back into a stall. Having a CG too far back can make a plane too inclined to stall, and with some planes it can create deep-stall behaviors that are unrecoverable.
Many planes are designed such that in normal flight the aircraft can't be pulled back into a stall because there's not enough elevator authority or thrust or some other consideration. At high angles of attack with the stick full back, the aircraft simply begins to "mush" or wallow downwards rather than experience the sudden loss of lift of a stall. Study flight manuals and pilot reports to learn how your aircraft behaves at high angles of attack.
The YASim attributes give you the ability to change the characteristics of a stall, but they're just numbers. Don't be a slave to them. Set some reasonable values and fly your plane. Tweak your numbers until you get the behavior you want. Hopefully what I've provided above will give you some guidance on how to do that.