YASim Weight and Balance
By Gary "Buckaroo" Neely
Good weight distribution and aircraft balance is necessary for good flight characteristics. In a real plane, it's also critical for safety. You can get in all sorts of bad situations with a CG that is too far forward or too far aft. After geometry, center of gravity (CG) placement is the most important aspect of creating your FDM. Don't even think about tuning other YASim numbers until you have the CG positioned correctly. If the aircraft CG is positioned right, it's possible to get a solution that flies well on your very first try with the solver.
The first step is to identify where the real CG should be. For most general aviation aircraft, the CG needs to be located forward of the aerodynamic center for the entire plane. If it isn't, the plane could become unstable in normal flight attitudes, a Bad Thing. The CG limits can be found on FAA certification sheets expressed as a percentage of MAC (mean aerodynamic chord, aka SMC, standard mean chord) or as offsets from some datum, usually the aircraft's nose or the wing's leading edge at the fuselage. The datum will given on the certification sheet. If you cannot find a CG range, you can make a guestimate based on ranges of 20-30% of MAC. 25% MAC is the typical figure. I suggest choosing a location in the 25-30% range, favoring the aft end. It's easier to find YASim solutions for aft-placed CGs for reasons I'll explain later.
If you lack a datum reference for placing the CG range, you'll have to calculate MAC. The goal is to learn where the CG range exists along the station-line or x-axis. This is easy with a wing shaped like a Hershey bar, where the airfoil shape and location is constant for the entire span. In these cases, 25% MAC is just 25% of the way back from any point on the leading edge. It's trickier with wings that have a taper and a sweep, and worse with airliner wings that often have two fundamental geometries, one for the long-chord inboard section, and another for the slender outboard section. In these situations you'll need to do a little work to find where the MAC lies along the wing.
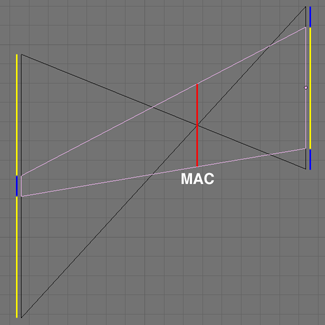
Geometry comes to the rescue. The image at right illustrates the use of geometry to find the MAC for a swept and tapered wing. Add the length of the root chord to the leading and trailing edges of the tip chord, and do the opposite at the root chord. Draw lines between the extremes at either end, and their intersection indicates the location of the MAC, the mean aerodynamic chord. Easy-peasy.
For aircraft with multiple wing segments featuring different geometries like many airliners, you can use the same strategy repeated. Treat the inboard and outboard sections as two different wings. Perform the above exercise for each wing section to find the MAC for each. Now, treat these two chords as the root and tip chord of a new "wing", and repeat the procedure to give a single MAC for both surfaces.
Once you know the MAC, you can locate your CG range as a percentage of the chord from its leading edge. Find the location of this point along the x-axis and you have your target x-axis CG position.
If you don't know the CG range and your model uses tricycle landing gear, you can make a good guess at the CG position by assuming about 8% of the aircraft's weight rests on the nose gear. This is a typical estimate used for many airliner designs to be certain enough weight rests on the nose gear to provide good traction for steering. It may be helpful in placing the CG.
After choosing a CG position within the range and identifying its position along the x-axis, the next step is to get YASim to place the CG at this desired location. Run a test against the command line solver. Don't worry about getting a solution, at this point all you care about is the "CG: x:" value.
The Ballast Element
Let's assume we have an small aircraft with an empty weight of about 2700 lbs, a nose at x=4 and a mid-chord wing located at x=1.446. A handbook calls for a CG range of 19% to 33% MAC (mean aerodynamic chord). YASim prefers solutions with the CG in the aft range, so let's shoot for something in the back half of that range, between 25% and 33% MAC. Running some quick calculations, we find the allowable range on the x-axis is:
25% MAC: CG at x=1.770
33% MAC: CG at x=1.590
So we'd like to see the CG lying on the x-axis somewhere between 1.590 and 1.770. Here's a trial run with the solver using no ballast:
E:\FlightGear 2.10\data\Aircraft\Yak-18T>yasim yak18t-yasim.xml
Solution results:       Iterations: 491
 Drag Coefficient: 20.699659
       Lift Ratio: 59.436172
       Cruise AoA: -1.541610
   Tail Incidence: 4.504022
Approach Elevator: -0.158732
               CG: x:1.159, y:-0.000, z:-0.135

  Inertia tensor : 5889.702, -0.000, 372.538
        [kg*m^2]   -0.000, 5150.064, 0.000
     Origo at CG   372.538, 0.000, 10834.974
The CG is lying much too far aft at x=1.159. We need to bring it forward to at least x=1.590. Let's redistribute some mass, placing a ballast just behind the aircraft nose and trying a mass of 500 for starters. That's about 20% of the aircraft's empty weight. Ballast adds no weight to the aircraft, all it does is shift's the aircraft's calculated mass according to the location defined in the ballast. In this case we're shifting the mass forward. We'll add a ballast element to the FDM like this:
<ballast x="3" y="0" z="0" mass="500"/>
and then run the solver:
E:\FlightGear 2.10\data\Aircraft\Yak-18T>yasim yak18t-yasim.xml
Solution results:       Iterations: 638
 Drag Coefficient: 20.207283
       Lift Ratio: 66.561714
       Cruise AoA: -1.550457
   Tail Incidence: 2.535978
Approach Elevator: -0.535204
               CG: x:1.566, y:0.000, z:-0.109

  Inertia tensor : 4562.464, -0.000, 236.895
        [kg*m^2]   -0.000, 4804.217, 0.000
     Origo at CG   236.895, 0.000, 9198.858
Better, but not quite in range yet. Let's try the same thing with the mass set to 700:
<ballast x="3" y="0" z="0" mass="700"/>
The solver now reports:
E:\FlightGear 2.10\data\Aircraft\Yak-18T>yasim yak18t-yasim.xml
Solution results:       Iterations: 665
 Drag Coefficient: 20.165134
       Lift Ratio: 68.989929
       Cruise AoA: -1.553766
   Tail Incidence: 1.839068
Approach Elevator: -0.666178
               CG: x:1.729, y:-0.000, z:-0.098

  Inertia tensor : 4031.066, -0.000, 190.487
        [kg*m^2]   -0.000, 4542.457, 0.000
     Origo at CG   190.487, 0.000, 8421.492
Not bad. That gives a CG at roughly 27% MAC. We could stop here and fly, or continue to refine the CG placement, perhaps changing the z-axis placement for different handling characteristics.
For purposes of establishing CG, add only a single ballast entry in the FDM. Don't get fancy with more than one entry at this time. I tend to weight the nose, as it is similar to how I would weight my R/C aircraft. But you can add ballast anywhere. The mass can be a negative number, indicating you are removing mass from that location. Remember that ballast is just mass-redistribution, so you're not adding or subtracting real weight. The y-axis should nearly always report 0 for CG. The z-axis will vary but is not critical to a solution so long as it is reasonable.
For a more refined CG placement, try learning a little about inertia tensors. The placement of mass has many effects on the behavior of an aircraft, and the YASim inertia tensor gives some information on how mass is distributed. I provide an introduction to the topic in Inertia Tensors and YASim.
Fuel Load
The CG is just a base target. One of the things that can affect CG is fuel load. The fuel load used by the solver is controlled by three things: the configuration of fuel tanks, the "fuel" attribute of the approach element, and the "fuel" attribute of the cruise element. Configuration of those elements is covered elsewhere. Here it's enough to know how they affect the aircraft weight when running the solver.
Fuel tank elements determine where fuel is located, and the total amount possible. For example:
<tank x="1.4" y="2" z="-0.500" capacity="150">
<tank x="1.4" y="-2" z="-0.500" capacity="150">
Here the aircraft has two tanks probably located in each wing root, each having a capacity of 150 pounds of fuel. The location is important, because 150 pounds in a light aircraft is a considerable amount of weight. It could have a significant affect on CG.
We need to tell the solver what fuel load will be in the tanks for the approach calculation and the cruise calculation. So we could use approach/cruise attributes like this:
<approach ... fuel="0.2">
<cruise ... fuel="0.7">
The solver will use 70% maximum fuel load for the cruise calculations, and 20% for the approach calculations.
Weights
Another thing that can affect CG is the non-fuel load of the aircraft: pilot, crew, passengers, baggage, cargo, real weights for ballast, etc. For a small single-person aircraft we could dispense with this and simply total the weight with the dry weight of the aircraft and set that value as the airplane mass:
<airplane mass="2863">
But it's more common that the load of the aircraft will vary. You allow virtual pilots to determine load at run time using the Flightgear Equipment menu if you configure the FDM and the -set file appropriately. Let's look at how to do that.
Let's say we have a general aviation aircraft having 2 front seats, 2 rear seats, and a small compartment for baggage behind the rear seats. In the YASim FDM, we first add 3 weight elements:
<weight x="1.6" y="0" z="0" mass-prop="/sim/weight[0]/weight-lb"/> <!-- Crew -->
<weight x="0.7" y="0" z="0" mass-prop="/sim/weight[1]/weight-lb"/> <!-- Passengers -->
<weight x="0.3" y="0" z="-0.2" mass-prop="/sim/weight[2]/weight-lb"/> <!-- Baggage -->
These elements give the locations for three weights that can be modified at run-time by changing the associated properties.
While still working with the FDM we want to add matching sub-elements to the approach and cruise elements:
<approach ... fuel="0.2">
  ...
  <solve-weight idx="0" weight="180"/>
  <solve-weight idx="1" weight="0"/>
  <solve-weight idx="2" weight="0"/>
</approach>

<cruise ... fuel="0.8">
  ...
  <solve-weight idx="0" weight="180"/>
  <solve-weight idx="1" weight="0"/>
  <solve-weight idx="2" weight="0"/>
</cruise>
What these do is specify the weights used for these positions by the solver. In this case, I'm telling the solver to consider only the weight of a typical pilot. Different weight configurations will give you different flight results, so experiment.
Now let's leave the YASim FDM and move to the <my-aircraft>-set.xml file. In the -set file you should have an element called "sim". We need to add a few configuration lines to the sim element:
<sim ...>
  ...
  <weight n="0">
    <name>Crew</name>
    <weight-lb>180</weight-lb>
    <max-lb>408</max-lb>
    <min-lb>100</min-lb>
  </weight>
  <weight n="1">
    <name>Pax</name>
    <weight-lb>0</weight-lb>
    <max-lb>529</max-lb>
    <min-lb>0</min-lb>
  </weight>
  <weight n="2">
    <name>Baggage</name>
    <weight-lb>0</weight-lb>
    <max-lb>100</max-lb>
    <min-lb>0</min-lb>
  </weight>
</sim>
This tells the Flightgear Equipment menu what limits and defaults to assign to the weight positions. Here I've assigned the plane to have a default load of the pilot only. This matches my YASim solution configuration, so the base flight experience will be close to the solver results. I've also assigned the front seats position to have a maximum weight limit of 408 pounds, and a minimum of 100 pounds. The rear seat position and baggage position work the same way.
You can use any number of weights in your aircraft. Weights can be used to simulate many things, such as the dropping of crop dusting chemicals, or a load of water for fire-fighting.
Further Thoughts
I've seen many YASim FDMs with inappropriately placed CG, and a surprising number where the developer placed the CG behind 50% MAC on a general aviation aircraft with a Hershey bar wing. Flying these models feels odd, even to someone like me with very little experience behind the stick of a real aircraft. Some describe the results as "flying on rails", of flying "like a game". The aircraft simply isn't pivoting where it should. If the aircraft's CG isn't at least ahead of 36% MAC, it's likely the aircraft isn't going to feel right to someone with real stick-time.
There are exceptions. Some early vintage aircraft had CG's well behind 50% MAC, relaxing pitch stability at the expense of being demanding to fly. YASim won't force you to set good weight and balance numbers. Just like a real plane you can likely fly with numbers out of the recommended range. Fortunately you don't risk death in a flight simulator. For my guide and recommendations, I am assuming relatively modern, conventional general aviation aircraft.
CG doesn't have to be exact. In flight it will move due to fuel consumption and movement of passengers, etc. But it does have to be reasonable. If you don't have a good feel for CG placement, then study weight and balance worksheets for general aviation aircraft. There are lots of them out there. If you don't quite understand this stuff, consider reading-up on some fundamentals of flight before working with YASim. It's fascinating stuff.